🎨 Building a Modern AI Frontend with Next.js (Part 3)
Fri Jan 16 2026
Designing a Modern, Device‑Agnostic AI UI Using Next.js App Router
🧠 Series Context
This is Part 3 of our step‑by‑step AI engineering series where we are building a local LLM–powered Wish Generator application.
So far we have covered:
- Part 1: Architecture, local LLMs & AI engineering fundamentals
- Part 2: Backend development with FastAPI & prompt engineering
In this post, we focus on the user experience layer — the frontend.
📘 Series Roadmap
| Part       | Topic
| ---------- | -------------------------------------
| Part 1     | Architecture & local LLM fundamentals
| Part 2     | Backend & prompt engineering
| Part 3     | Frontend with Next.js
| Part 4     | Dockerization & cloud shipping
| Part 5     | AI Engineering Lessons from Building a Local LLM App
🎯 Objective of Part 3
By the end of this post you will understand:
- Why Next.js is ideal for AI applications
- How to design a Single Page Application (SPA)
- How to build device‑agnostic responsive UI
- How to integrate FastAPI asynchronously
- How to display AI responses elegantly
- How to design UI that feels premium, not demo‑like
🤔 Why Frontend Matters in AI Apps
Most AI demos fail not because the model is weak — but because the UI feels broken.
Users judge intelligence based on:
- Response timing
- Visual feedback
- Layout clarity
- Smooth transitions
- Readability of generated text
A strong frontend can make an average model feel smart.
A weak frontend can make a powerful model feel unusable.
⚛️ Why Next.js?
Next.js has become the default framework for AI products.
Used by:
- OpenAI playground
- Vercel AI SDK
- Perplexity
- LangChain demos
- Claude UI concepts
Key advantages:
- App Router (modern React)
- File‑based routing
- Built‑in optimization
- SPA support
- Excellent API integration
- Perfect with Tailwind CSS
🧱 Frontend Architecture
Next.js SPA
   ↓
UI Components
   ↓
API Client Layer
   ↓
FastAPI Backend
Frontend responsibilities:
- Collect structured user input
- Trigger backend generation
- Await AI response
- Render multiline wishes
- Provide copy‑to‑clipboard
- Remain responsive on all devices
📁 Project Structure
app/
 ├── layout.tsx
 ├── page.tsx
 ├── globals.css

components/
 ├── WishForm.tsx
 ├── ResultCard.tsx

lib/
 └── api.ts
Clean separation improves maintainability.
🧩 App Layout Setup
layout.tsx
import "./globals.css"
import { Inter } from "next/font/google"

const inter = Inter({ subsets: ["latin"] })

export default function RootLayout({
  children,
}: {
  children: React.ReactNode
}) {
  return (
    <html lang="en">
      <body className={inter.className}>
        {children}
      </body>
    </html>
  )
}
Explanation
- Global font loaded once
- Shared theme across pages
- No page reloads
🎨 Styling with Tailwind CSS
Tailwind allows:
- Rapid prototyping
- Consistent spacing
- Device‑agnostic layouts
- Clean responsive breakpoints
Example utility usage:
<div className="grid md:grid-cols-3 gap-4" />
Automatically adapts for:
- Mobile
- Tablet
- Desktop
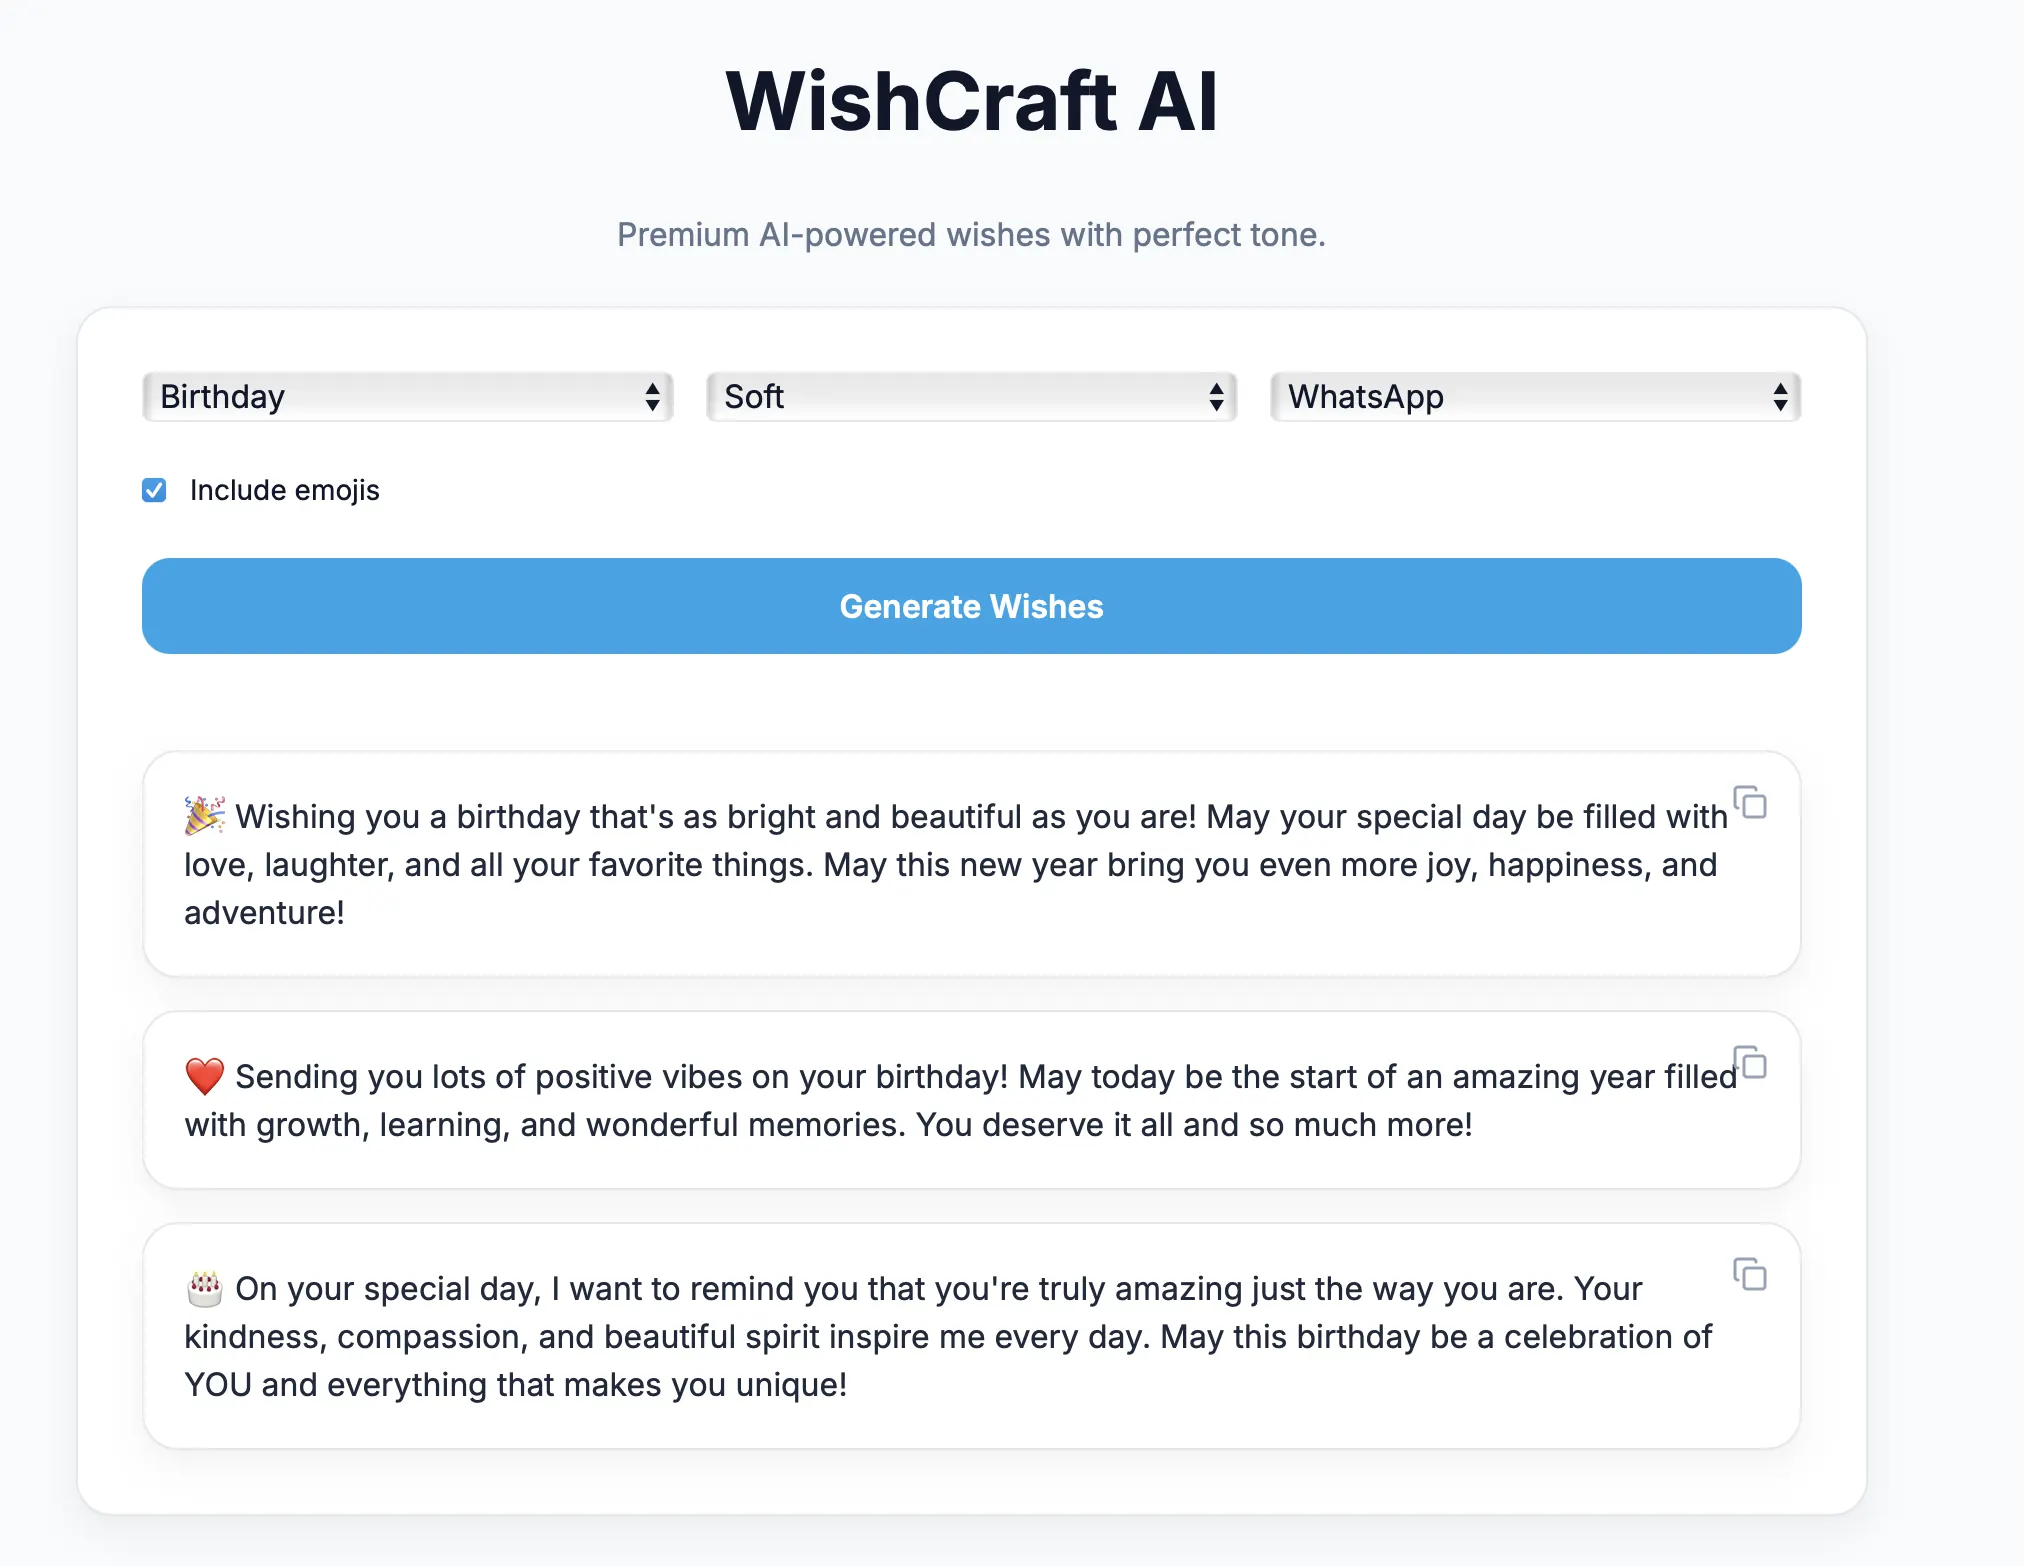
🎯 Designing Elegant Inputs
Instead of old‑school forms, we use:
- Rounded selectors
- Soft shadows
- Clear hierarchy
- Minimal text
Example selector
<select
  className="rounded-xl border px-4 py-3 bg-white"
>
  <option>Birthday</option>
  <option>Anniversary</option>
</select>
This improves usability instantly.
🔌 API Integration Layer
lib/api.ts
export async function generateWish(payload: any) {
  const res = await fetch(
    "http://localhost:8000/generate-wish",
    {
      method: "POST",
      headers: { "Content-Type": "application/json" },
      body: JSON.stringify(payload),
    }
  )

  return res.json()
}
Why separate API logic?
- Reusable
- Testable
- Environment‑based URLs
- Cleaner components
🧠 Wish Generation Component
WishForm.tsx
const [loading, setLoading] = useState(false)
const [results, setResults] = useState<string[]>([])

async function submit() {
  setLoading(true)
  const data = await generateWish(form)
  setResults(data.suggestions)
  setLoading(false)
}
Key UX improvements
- Loading indicator
- Disabled button
- Async await pattern
- Smooth state updates
🎴 Rendering AI Output
Each generated wish is displayed inside a reusable card.
ResultCard.tsx
export default function ResultCard({ text }) {
  return (
    <div className="card p-5 relative">
      <button
        onClick={() => navigator.clipboard.writeText(text)}
      >
        Copy
      </button>

      <p className="whitespace-pre-line">
        {text}
      </p>
    </div>
  )
}
Why this matters
- Multiline rendering preserved
- Copy‑to‑clipboard improves usability
- Clean separation of logic
📱 Device‑Agnostic Design
The UI automatically adapts:

| Device  | Layout         |
| ------- | -------------- |
| Mobile  | Vertical stack |
| Tablet  | 2‑column       |
| Desktop | 3‑column       |

Handled entirely by Tailwind breakpoints.

No custom media queries needed.
✨ UX Details That Matter
Small features that dramatically improve perception:
- Smooth spacing
- Clear typography
- Generous padding
- Readable line height
- Consistent colors
These details make the AI feel smarter.
🔄 Complete Frontend Flow
User selects inputs
   ↓
Next.js SPA submits request
   ↓
FastAPI generates wishes
   ↓
UI waits asynchronously
   ↓
Results animate into view
No reloads. No blocking.
🧠 Why Next.js Fits AI UX Perfectly
- Async‑friendly
- Streaming‑ready
- Component‑driven
- Ideal for AI text rendering
- Production‑grade
This is why almost all modern AI startups use it.
🔜 What’s Coming in Part 4
In the next post we will cover:
- Dockerizing FastAPI
- Containerizing Ollama
- Local LLM deployment
- Shipping to cloud VMs
- Environment‑based scaling
👉 Part 4 – Dockerization & Cloud Shipping
✨ Final Thoughts
A strong frontend does not make AI smarter
It makes intelligence visible.
When backend, prompt, and UI work together,
AI stops being a demo and becomes a product.